
When was the last time you made a paperdoll chain? It's always magical when you get finished cutting out all those geometrical turns and curves to open it up and see that it actually works, all those holding hands :). I made a skirt for Divine a few years ago inspired by making paperdolls one day and loved it. She didn't wear it very much because I didn't put any elastic in the waistband and those little girl waists just can't keep it up properly. So, I've revamped it and made one for my Pearlie girl. It's a two part tutorial, though, and the actual paperdoll applique is being featured in the free online magazine Delish! It's kind of thrilling to see my work in something that is so official :)


Back view. Yes, another faux placket. I seem to love those, don't I? The buttons are made from coconut shells my sister brought back to me years and years ago when she spent several months in the Tongan Islands. See, I always find the perfect project for each of my precious buttons...eventually.

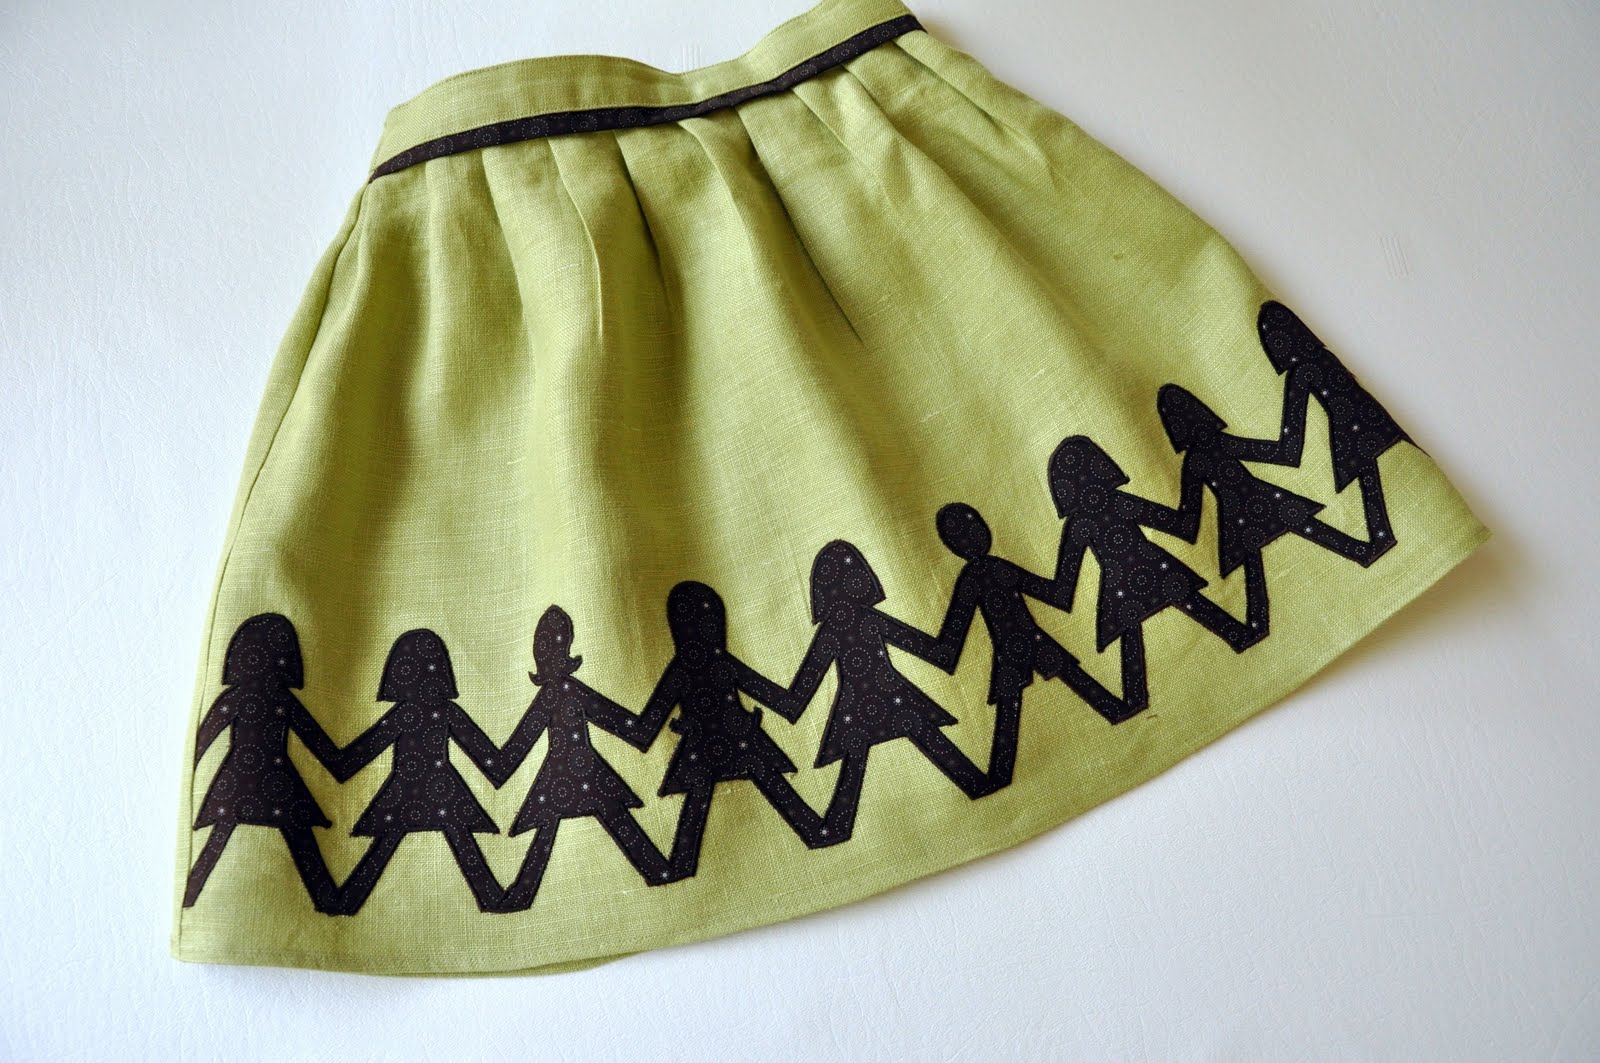
•As a side note regarding fabrics I used, the green is a loosely woven linen and the brown is cotton with a simple, small pattern. I wouldn't suggest using a loud print for either skirt or applique. Pre-washing both fabrics is important since the shrinkage might be different with different fabric content.

Cut a strip of contrasting fabric the same length as the skirt front as well as twice the length (you'll use this later), 2" wide, fold in half and press. Sew to top of skirt front.

Take smaller tucks in skirt back, keeping wider than measured waist back, as you will be gathering this with elastic.


Pin prepared edging on either side.


Stitch waistband to skirt.


Hem bottom by turning under twice 1/2" and stitch.
That's it!
This is such a fun skirt, and I absolutely love the button placket!!
ReplyDeleteSo cute, Katy! Really creative. Congrats on being in a magazine as well!
ReplyDeleteLOVE the skirt! And congratulations on the Delish publication.
ReplyDeleteKaty...clever as always! And I am excited to see you looking so official and I am not even your mom or dad. Well done!
ReplyDeleteHow super cute! My mom's a first-grade teacher, and I can totally see her wearing something like this. Maybe I should do something about that!
ReplyDeleteVery cute! I hope to make this for my daugther.
ReplyDeleteWhat a fun skirt! Love the faux placket, the little tucks instead of gathers, and your hot dog style description. :) I also really like your decorative stitching.
ReplyDeletei saw this over at Delish this morning and new it was yours from your teaser post :), love it!!!
ReplyDeleteYour work should be in all kinds of official ... you're so talented! Adorable skirt.
ReplyDeletebeautiful katy, as usual :)
ReplyDeleteso cute! i love the fabrics you used... definitely going to make one of these! thanks!
ReplyDeleteI really love paper dolls, and I really love your skirt! Beautiful and fun. (I would totally wear it.)
ReplyDeleteI love Pearle's new skirt. It is so cute. I loved the one you made for Divine too. Congrats on your magazine piece. I love how the pages turn in the online magazine.
ReplyDeleteBeautiful Skirt, Katy!
ReplyDeleteyou are so talent! i adore this little skirt...don't know that mine would turn out as cute though :)
ReplyDeleteBeautifully done Katy, I love all that extra detail you put in to your creations. You are extrememly talented!
ReplyDeleteIt's fabulousness!! I linked to your tutorial on Craft Gossip Sewing:
ReplyDeletehttp://sewing.craftgossip.com/tutorial-paperdoll-appliqued-skirt/2011/07/12/
--Anne
reminds me of the paper dolls that sort of didn't work out when we visited your laurel class... :)
ReplyDeleteLove this! But, since I was gifted with only little boys I will make a tote bag with this applique. Thanks for the great project.
ReplyDeleteMaterials girl-yes! this technique could be used in so many ways:
ReplyDeleteapron
bedskirt
tote bag
jacket
quilt
curtains
tablecloth
please post photos to flickr if you do!
this is gorgeous. one day i 'll have the guts to attempt it! xo m.
ReplyDeleteI love this skirt. Just the back could stand on its own in a skirt as well! You are so talented! Thank you for sharing that with us.
ReplyDeleteWhat kind of fabric did you use for the main skirt? Is it linen?
Love this skirt. I'm making one for one of my girls. I've tried clicking on the link and it's not working for me. Is something wrong with the website?
ReplyDeleteMomma of 7-the link works for me, you do have to wait for several seconds for it to load. If that still doesn't work, here's the direct link:
ReplyDeletedelishmag.com
Let me know if either of those works!
I got it now! It doesn't work from my iPad that's why.
ReplyDeleteIt´s so well explained that it ís seemed so easy !!!
ReplyDeleteI ´m a very beginner and tutorials like yours will help me a lot...I´ll have only to translate correctly !!! Fortunately you make very good photos...
Besitos andaluces
Love the skirt! I'll be linking to this project on AllFreeSewing soon :)
ReplyDeleteThanks!
Kirsten
Editor
AllFreeSewing
Love it! I was unable to find the applique tutorial when I clicked on the link. H.E.L.P.! :)
ReplyDeleteStirringupthegifts--click on the second link and flip to the 26th page and it should be there.
ReplyDeletei love this skirt. but what measurement am i supposed to cut? (i.e. twice the waist measurement?) really cute, thanks!
ReplyDeleteKaylee-It really depends on how full you want it. Twice the waist would be a very full skirt. 1 1/2 the waist measurement is closer to what I have pictured.
ReplyDeleteI guess I missed something, I don't see how you did the paper dolls on the front of the skirt. Is it reverse applique or sating stitched on, how are they put on?
ReplyDeleteMama G
Mama G--The first paragraph has the link to the applique portion in the free online magazine, Delish. Just click on that and flip to page 26.
ReplyDeleteJust wanted to say thanks for your fantastic tutorials , so easy to follow - am going to give a swimsuit a try next.
ReplyDeletePlease provide applique directions because it is no longer on the Relish site. Thbank you.
ReplyDeletesewhelpme--Actually, it's still available if you click through the link in the post (I just did it). It's actually "Delish" not "Relish", so that might be the problem if you're just googling it.
ReplyDeleteI read a lot of tutorials and am sometimes impressed but rarely enough to make a comment (sorry if that sounds snobbish)
ReplyDeleteI can't wait to make this skirt ----it's a work of art. Fun but elegant at the same time
Well done