

But that doesn't keep me from enjoying her personality, because it shines through her writing, bright and clear on her blog, The Cupcake Goddess. She is witty, intelligent, and she knows her sewing techniques [as will be beautifully showcased today.]

She leans toward the vintage look, and does so quite finely. I am so pleased to have Sunni here with us today, with a different slant on children's books.

Nancy Drew and the...Hand Worked Buttonhole! Today, I bring you a tutorial on how to hand work a buttonhole. What does this have to do with Nancy Drew, you might ask?

You will need the following:
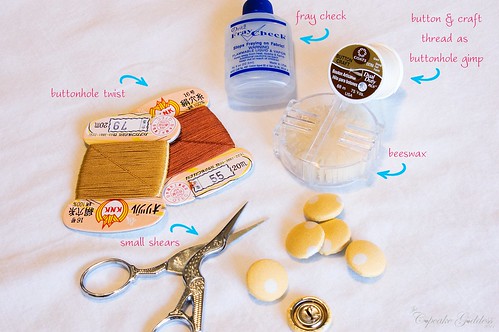
♥ buttonhole twist (you can buy beautiful silk threads here or another option is to use the pearlized cotton found by the embroidery threads)
♥ buttonhole gimp (I use a strand of the buttonhole twist or for a sturdier option use button and craft thread)
♥ beeswax
♥ fray check
♥ small shears or a seam ripper for cutting buttonholes

Start by measuring your button. You'll need to get the diameter plus the thickness of each button. For example, my button diameter is 3/4" and my thickness is 1/8" so I need to create a buttonhole that is 7/8". Transfer this marking onto your fabric.
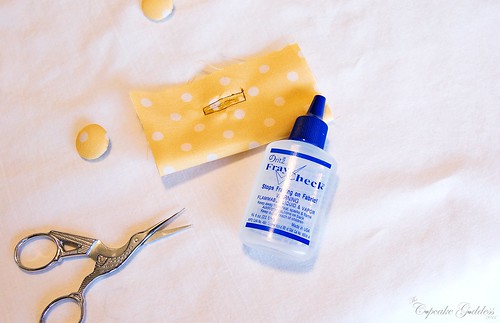
Please note that I'm using contrasting threads to that of my fabric for visual effect, it's up to you whether or not you want to do the same! You now need to create a boundary for your buttonhole with your machine. Machine stitch a scant 1/8" on each side and across both ends of the buttonhole marking. Carefully slash the buttonhole down the middle and add a little fray check to the slash.
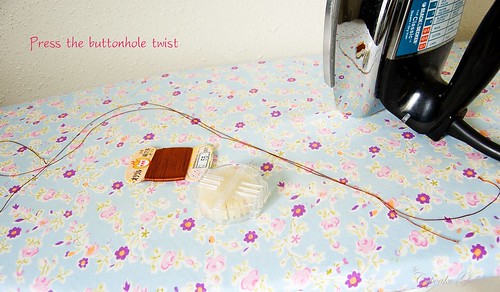
While the fray check is drying, cut an 18" length of buttonhole twist and run it through your beeswax. Press the thread with a hot, dry iron allowing the beeswax to more thoroughly coat the thread.
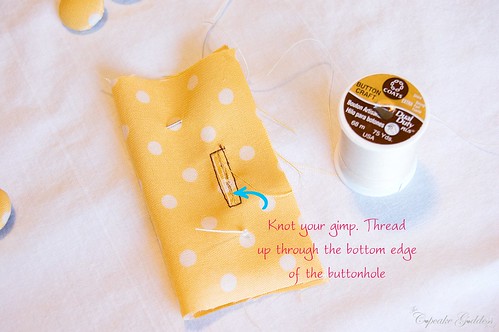
Once fray check is dried, take a long length of your buttonhole gimp (either a strand of the twist or the button and craft thread) and tie a knot in one end. About 1/2" away from the buttonhole, thread your buttonhole gimp through the fabric and up through the bottom end of the buttonhole.
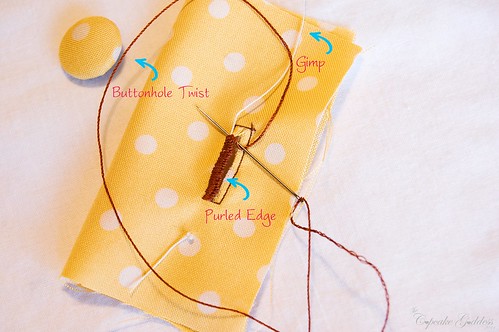
Taking the buttonhole twist in hand, begin the buttonhole by back tacking the reverse side of the buttonhole to secure the thread in place (this is in place of a knot). Thread your buttonhole twist up through to the right side of the buttonhole in the corner opposite the slash. Allow the gimp to lay across the buttonhole and start working the buttonhole across one of the long edges. The buttonhole stitch is a stitch many are already familiar with - its your basic blanket stitch! Now how cool is that? Tip - the key to a well worked buttonhole is even stitching along with keeping the purl (the small braid that forms on the inside lip of the buttonhole flat against the edge)
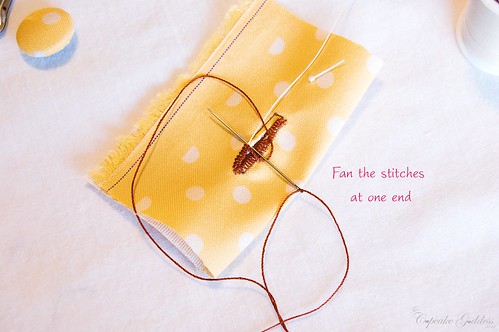
As you near the first opposing end of the buttonhole, begin to fan the stitches to round the corner. Now this fan is only going to be on one end and a bar tack on the other, alright? Alright.
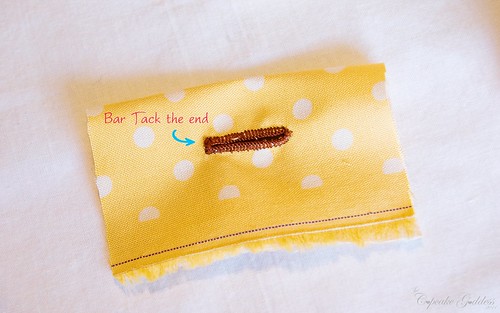
To finish off the buttonhole, you'll need to bar tack the end. To make a bar tack, take 3 or 4 long stitches across the width of the buttonhole and then blanket stitch over the top of the those long stitches catching a bit of the fabric underneath. This forms a rather beautiful braid at the end of the buttonhole and gives it a very sturdy and long lasting finish.
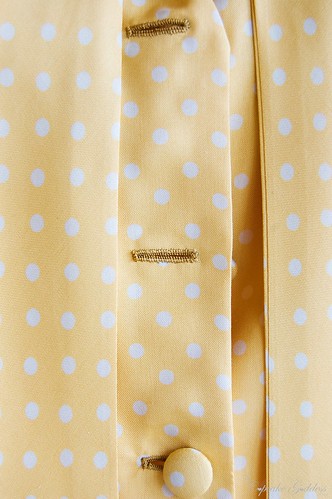
Pull the thread through to the reverse side of the buttonhole and back tack in place to secure the end the thread. Cut the knot in the gimp and bring both gimp threads through the reverse side of the buttonhole. Trim all threads close to the buttonhole.
A few tips:
♥ when working the buttonhole, allow a small space in between each stitch. the buttonhole stitch is not meant to be a satin stitch
♥ make sure that the buttonhole area has been interfaced
♥ use a similar color gimp as the color of your fabric
♥ use a different slightly different shade of buttonhole twist from the color of your fabric to really make the buttonholes stand out
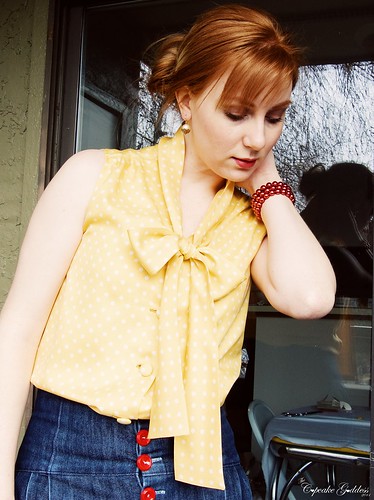
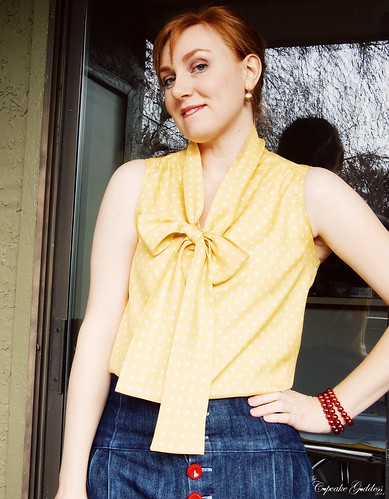
I hope you enjoyed this little tutorial on how to make your own hand worked buttonholes! Here's a bit more info on my blouse: It's made by me from Simplicity 7896 a vintage pattern from 1977 that took a cue from the 40's. I left out the sleeve, because I didn't have enough fabric, used cover buttons and of course finished it off with handworked buttonholes. It's made from a luscious silk shirting I bought online from Fashion Fabrics Club. There you have it, a cheeky blouse with a perfect bow!


* * *
Sunni, Nancy would approve! Thank you for your help in solving the mystery of honing our hand worked buttonholes. I've a stash of silk thread that now knows its fate.
I couldn't be happier that you posted this today! My Mom just gave me a HUGE button, and my machine doesn't make buttonholes that big. Was going to do some research on how to hand sew them...and here you are. Thank you!
ReplyDeleteSorry everyone! A reader pointed out to me that the buttonhole stitch is more like the blanket stitch in reverse! Which is true! So sorry. I've linked to a webpage that shows the difference between both.
ReplyDeletehttp://www.ushist.com/general-information/hand-stitch_buttonholes.shtml
xoxo,
Sunni
Thanks for this! It might be the option I need to handle an automatic buttonholer that isn't so automatic... or buttonholey! ;)
ReplyDeleteTalk about great timing! I was just looking for how to do this! I use a machine from 1953 that only does a straight stitch, no fancy schmantzy stuff like button holes. Thanks for this timely post!!!
ReplyDeleteOH I couldn't wait to see what you'd do! Nancy Drew was (is) one of my favorites. I love all the detailed descriptions of her prim and proper outfits in the midst of her mystery solving detective work. You certainly did not disappoint! I love the top (the fabric is perfect!) and this kind of hand-done detail is so endearing. Thanks!
ReplyDeleteI have [long-term] plans of learning how to handsew. I am severly lacking in that skill right now. This is so awesome, and looks like something I could do. I'm totally bookmarking.
ReplyDeletei have GOT to try this. i have so many unfinished projects that lie in my closet due to terror of the buttonhole.
ReplyDeleteThis is so awesome, I really want to try handmade button holes! Great tutorial, so compelling!
ReplyDeleteI love the connection to Nancy Drew's resourcefulness and the hand sewn buttonhole. What a very pretty touch to a beautiful top!
ReplyDelete